Are you looking to properly remove your drawers with metal glides and no levers? Follow our step-by-step guide below to accomplish this task safely.
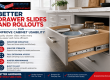
What To Know About Metal Glides
In most cases, metal glides will consist of two main parts, including the drawer slide and ball bearing. The drawer slide is a horizontal track that the drawer will glide along when open and closed.
A roller or ball bearing is a small, spherical component used to move the drawer along the drawer slide. This part is usually housed within the drawer slide.
Steps To Remove Drawers With Metal Glides And No Levers
Once you understand metal glides, you can follow this step-by-step guide to remove the drawer(s) safely and efficiently.
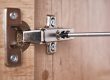
Step 1. Find The Release Tab
- Start by locating the release tab.
- Thoroughly inspect the sides of the drawer, paying attention to where the drawer ultimately meets the cabinet frame.
- Typically, you will find a small lever or tab near either the drawer’s front or back.
- This is known as the release tab.
- The tab is there to allow you to detach the drawer from the drawer slide.
Step 2. Press The Release Tab
- Either slide or press the release tab, at this time.
- Press or slide the tab in the appropriate direction, which may vary based on the design of the metal glides.
- Always make sure to reference the manufacturer’s instructions for guidance with this step.
Step 3. Pull The Drawer Straight Out
- Use the release tab and carefully pull the drawer straight out of the cabinet frame.
- Be very careful to not angle or tilt the drawer as you are pulling it out.
- Doing so could cause damage to both the drawer and cabinet frame.
Step 4. Remove The Drawer From Its Slide
- Once you have the drawer fully extended, you need to detach it from the drawer slide.
- You can do this by lifting the drawer slightly and pulling it away from the slide.
- It is possible that there will be additional clips or screws that must be removed before it can be fully detached.
Step 5. Clean The Drawer Slide
- Next, both clean and inspect the drawer and its slide.
- Remove any visible debris, dust, or buildup that has accumulated over time.
- Inspect the slide for any visible signs of wear and tear or damage.
- If you see any issues, it’s best to replace the slide before reinstalling the drawer altogether.
Step 6. Reinstall The Drawer
- Lastly, it’s time to reinstall the drawer.
- Simply reverse the steps detailed above.
- Attach the drawer back to the drawer slide, ensuring it is aligned properly.
- Slide the drawer back into the cabinet frame until fully sealed.
- Slide or press the release tab back to its original position.
- Now secure the drawer in its place.
Conclusion
Always refer to the manufacturer’s instruction for this step-by-step process. Make sure the proper tools are on hand, including pliers or screwdrivers.
If you encounter any issues during this task, feel free to reach out to the experienced team at Drawer Connection Inc. right here!
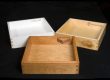
Buy New Drawer Slides & Drawer Boxes
If your drawer slides are worn out or you need new drawer boxes DC Drawers is your source for high quality drawer slides, and the best drawer boxes.
We offer the top brands of new and replacement drawer slides and custom made drawer boxes. In addition we offer in drawer power outlets and many other cabinet drawer convenience options. Read about how you can get cheap drawer boxes that are the finest quality at the best prices.